How to Size a Solar Inverter: A Homeowner's Guide
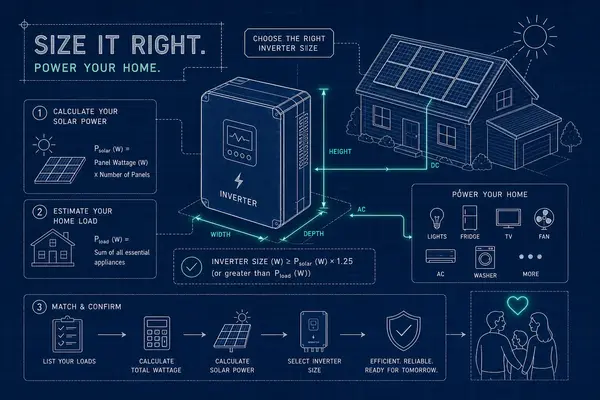
How do I size a solar inverter for my home? It's the question most homeowners don't ask until they've already made a costly mistake. They count the panels, match the kilowatts on paper, and place the order, only to discover months later that their inverter can't handle startup loads, throttles output on hot days, or leaves no room for the battery storage they'll want in three years. At Smart Home Authority, sizing questions are the most common issue we hear from readers who already have panels on the roof and are now second-guessing every spec on the inverter box.
This guide walks through the same five-step method professional installers use, stripped of the jargon. By the end, you'll know your required continuous wattage, surge capacity, optimal DC-to-AC ratio, and which inverter type fits your situation. No electrical license required.
How Do I Size a Solar Inverter for My Home? Start with Actual Wattage Demand
Add up the running watts first
Continuous wattage is the total power your home draws when critical appliances run at the same time. Find the wattage for each appliance on its nameplate label. If the label shows only volts and amps, the formula is simple: Watts = Volts × Amps. A 120V appliance drawing 10 amps pulls 1,200 watts.
For a realistic baseline, a typical U.S. home running simultaneously includes a refrigerator (~200W), central HVAC (~2,000, 3,500W), lighting (~300W), a water heater, and miscellaneous electronics. That puts most homes between 3,000 and 7,000 watts under normal daily conditions, with peak simultaneous loads climbing to 12,000, 20,000W when the dryer, oven, and AC all run at once. Your continuous running total is the floor of your sizing math, not the ceiling.
Surge watts: the number that protects your inverter
Motor-driven appliances don't just draw their rated wattage at startup. They spike. A central AC compressor can surge to 15,000W at startup. A refrigerator surges to 1,200, 2,200W. A well pump hits 1,500, 4,500W. A sump pump surges to roughly three times its running watts.
Here's the critical rule most DIYers miss: you don't add every surge value together. You add only the single largest surge to your total running watts. Appliances rarely start simultaneously. So if your running load is 4,500W and your AC compressor surges to 12,000W, your inverter needs to handle a peak of 16,500W without tripping. Ignoring this single calculation causes more inverter failures and nuisance trips than any other sizing error.
Step 2: Match Your Inverter to Your Solar Array with the Right DC-to-AC Ratio
The DC-to-AC ratio installers use by default
Once you know your load, the next calculation connects your panel array's total DC output to your inverter's AC output rating. This relationship is called the DC-to-AC ratio, or PV-to-inverter ratio. The industry standard sits at 1.15, 1.25, with 1.2 as the practical default for most residential installations in the U.S.
The logic is straightforward: panels almost never produce their rated output under real-world conditions. Slight array oversizing relative to the inverter captures more energy during morning and evening hours when irradiance is lower. The result is more annual kilowatt-hours without a meaningfully larger inverter.
When clipping matters, and when it doesn't
Clipping happens when the PV array briefly produces more than the inverter can handle, and the inverter limits its output to protect itself. That excess production is lost. At a 1.0 ratio, clipping is essentially zero. At a 1.25 ratio, annual clipping loss runs only 1, 1.5% of total production in most U.S. climates. Even in high-irradiance states like California, Arizona, and Texas, a 1.25 ratio typically clips less than 2% annually.
That's a widely accepted trade-off. What's not accepted is pushing the ratio above 1.3 without engineering analysis. Major manufacturers cap their warranty coverage at 1.35. Beyond that, clipping losses accelerate and the math stops working in your favor. A practical worked example: a 10kW panel array pairs correctly with an 8.0, 8.7kW inverter, landing your ratio right in the 1.15, 1.25 sweet spot.
Step 3: Adjust for Real-World Losses Your Datasheet Won't Show You
Efficiency losses and thermal derating
Even a high-quality inverter loses 2, 5% of power during DC-to-AC conversion. Datasheets report peak efficiency under ideal lab conditions, not the average efficiency your system will achieve across a full year. That gap matters when you're cutting sizing margins thin.
Thermal derating is the bigger variable most homeowners overlook. When an inverter's internal temperature reaches 45, 50°C, it begins reducing output along a manufacturer-defined derating curve to protect its components. In hot climates or poorly ventilated installation spots like south-facing garages or metal utility sheds, this isn't a rare edge case. It's a regular summer occurrence. A 6kW inverter running at 40°C ambient can drop to an effective 4.8kW output. Your loads don't care about that difference. For a quick reference on manufacturer derating policies and what to watch for, consult this guide to derating factors.
The 80% rule and altitude correction
Size your inverter so your maximum continuous load represents no more than 80% of the inverter's rated output. This single buffer absorbs efficiency losses, thermal derating, and gradual component aging all at once. If your continuous load peaks at 5,000W, you want an inverter rated for at least 6,250W, not 5,000W.
Altitude adds another layer. Above 3,000 feet, thinner air reduces the inverter's ability to shed heat through convection. Derating begins sooner and runs deeper than at sea level. If you're in the Colorado Front Range, elevated parts of Arizona, or similar high-altitude regions, the DC-to-AC ratio alone won't give you an accurate picture. Pull the inverter's technical datasheet and find the derating curve. It's the spec most homeowners never read and the one with the most real-world impact in hot, high-altitude climates.
Step 4: Let Your Inverter Type Change the Calculation
String vs. microinverter sizing differences
A string inverter uses a single DC-to-AC ratio calculation for the entire array. The sizing math from Steps 1, 3 applies directly and cleanly. Microinverters work differently: each panel gets its own dedicated inverter unit, so there's no array-level DC-to-AC ratio to calculate. The total system capacity, the sum of all individual microinverter AC outputs, still needs to meet or exceed the home's maximum load demand.
Microinverters don't clip at the system level the same way string inverters do, which is an advantage in partially shaded arrays. But the total nameplate AC capacity still drives the sizing decision. Don't let the distributed architecture fool you into thinking the total capacity numbers don't matter, because they do.
Hybrid inverter sizing requires a different approach entirely
A hybrid inverter must be sized to the home's maximum load demand, not just the panel output. During a grid outage, it becomes the sole power source for your home. The inverter's AC output rating should be at least 1.2 times your home's maximum continuous summer load to account for thermal derating under high-demand conditions.
Battery compatibility adds another variable. The inverter must match the battery bank's nominal voltage. Most residential lithium systems run at 48V, and your inverter's DC input range must match that spec. At 48V, a 5,000W load draws roughly 104 amps. At 24V, that same load draws 208 amps, requiring significantly heavier wiring and more heat-generating resistance in every connection. For whole-home backup systems, 48V is the standard.
Also factor in round-trip efficiency losses of 10, 15% when calculating how much solar generation you need to keep the battery charged. If you need 10kWh of usable backup energy, your battery needs to store 11, 12kWh to cover what's lost in the charge/discharge cycle.
Step 5: Build In Expansion Margin and Avoid These Common Sizing Errors
Sizing a solar inverter for your home means leaving headroom for growth
Plan for at least 20, 25% more inverter capacity than your current load and array require. Adding panels to an undersized inverter is expensive and often means replacing the inverter entirely rather than just adding hardware. If battery storage is even a remote possibility in the next five years, choosing a hybrid inverter now avoids a full system swap later.
Once you have your sizing specs in hand, Smart Home Authority's solar inverter buying guide and comparison tools are the logical next step. The guide filters options by capacity, inverter type, and battery compatibility, practical filters that skip the spec-sheet comparison work. Start with your numbers, then use the home-organization Articles to keep your install area tidy while you plan.
The four mistakes that cost homeowners the most
These aren't theoretical errors. They're patterns that show up repeatedly in real installations:
-
Sizing only to current panel wattage without accounting for future expansion, leaving no path to add panels without replacing the inverter.
-
Ignoring surge capacity and buying a continuous-rated inverter that trips every time the AC compressor starts.
-
Installing in a poorly ventilated location and experiencing regular thermal derating every summer afternoon, months after installation.
-
Choosing a grid-tied-only inverter when your utility has announced time-of-use pricing shifts that make battery storage financially attractive within the next 2, 3 years, this locks out the battery option entirely and forces a full system replacement later.
Once you've avoided those mistakes, compare models and warranties carefully. For extra practical tips and unrelated but handy household gear that often helps during installation or service calls, see The Ultimate Road Trip Lifesaver: This Portable Electric Air Inflator is a Must-Have.
Sizing a Solar Inverter for Your Home: The Five-Step Summary
The five-step method for sizing a solar inverter for your home comes down to this: calculate your running and surge watts, apply the 1.15, 1.25 DC-to-AC ratio, apply the 80% rule to absorb derating and efficiency losses, choose the inverter type that matches your system architecture, and build in 20, 25% expansion margin. Each step takes under 30 minutes with your appliance nameplates and a basic calculator.
Replacing an inverter two years into operation means labor costs, potential permit fees, and compatibility headaches with an array that's already installed. Getting the sizing right before purchase eliminates that risk entirely. The numbers aren't complicated, and now you have them.
Head over to Stop Making Your Home Look Cheap: 4 Simple Elevating Fixes next. You now have your capacity target, your ratio, and your inverter type preference. The guide filters models by all three so you can compare real products against real specs without sifting through marketing claims.
Frequently Asked Questions
How do I size a solar inverter for my home?
Start by calculating your home's total continuous running watts and peak surge watts from appliance nameplates. Apply a DC-to-AC ratio of 1.15, 1.25 to connect your panel array size to your inverter's AC rating. Then apply the 80% continuous load rule to buffer for thermal derating and efficiency losses. Finally, choose the right inverter type (string, microinverter, or hybrid) and add 20, 25% headroom for future expansion.
What size inverter do I need for a 10kW solar system?
A 10kW panel array pairs best with an 8.0, 8.7kW inverter. That keeps your DC-to-AC ratio in the 1.15, 1.25 range that most U.S. installers and manufacturers recommend for residential systems.
What is the 80% rule for solar inverter sizing?
The 80% rule means your maximum continuous load should never exceed 80% of the inverter's rated output. This buffer accounts for efficiency losses, thermal derating in hot weather, and gradual component aging over the system's lifetime. A home with a 5,000W peak continuous load needs an inverter rated for at least 6,250W.
Does a hybrid inverter need to be sized differently?
Yes. A hybrid inverter must cover the home's full maximum load during a grid outage, not just match the panel output. Size it to at least 1.2 times your maximum continuous summer load, and verify that its DC input voltage range matches your battery bank's nominal voltage, typically 48V for whole-home backup systems.